I would looooove a pink kitchen!
🙂
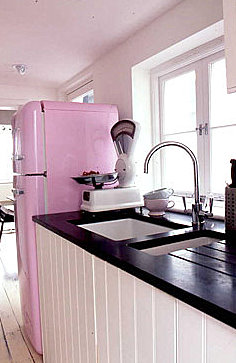
and given that I love vintage…look at the scale, so cool.
Well, just a dream…
I would looooove a pink kitchen!
🙂
and given that I love vintage…look at the scale, so cool.
Well, just a dream…
I had Tofu and wanted to give it a try since I became Fishetarian a couple of months ago…I read about some recipes and adapted a little bit of this and a little bit of that and the result: Brilliant.
you can use any vegetables, but I had those in my fridge.
Ingredients (for 2 with left overs)
half a pack Vermicelli Noodles (Or any other actually)
Asparagus – 1 bunch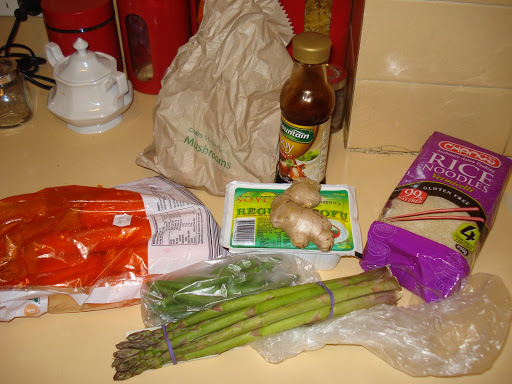 1 carrot
8 Button mushrooms
a bunch of Green beans
1 package (250g) hard tofu
1 tsp of sugar
1 clove Garlic
1 small piece of Ginger
50ml Soy Sauce
1 tsp Sesame seeds
4 tsp Vegetable oil
Vegetable stock (250ml)
Some chilli powder if you wish
Lemon Juice
 Method:
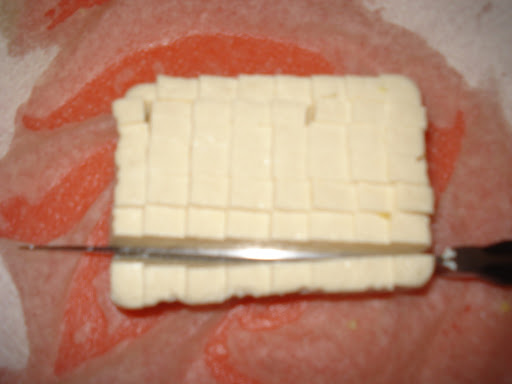
First, drain the tofu in paper towel
Cut in small squares
Slice the Ginger and chop the garlic, and place it in a bowl with soy sauce and lemon juice and 1 tea spoon of sugar.
you need enough liquid to coat the tofu…leave to marinate.
Chop the vegetables
Prepare the noodles as per package instructions. In my case, put it in cold water for 10 minutes.
 Heat up some oil in a wok, add sesame seeds, and stir fry the tofu (Reserve the marinate). In my case I did it in 2 batches. Stir fry for 1 minute and dry it in a plate with paper tower. (Try to keep the oil in the wok).
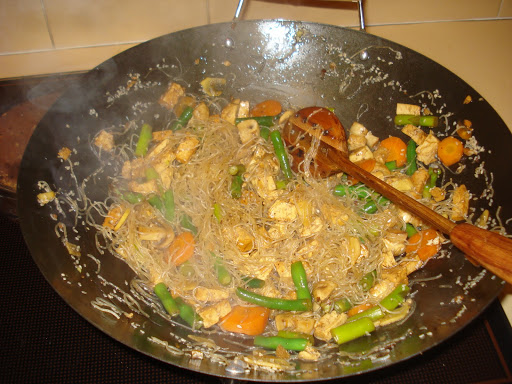
With the remaining oil in the Wok, add the Marinated (Soy sauce and lemon) and the hard vegetables ( I kept mushroom for later)…stir fry for 1 minute or 2, and add vegetable stock.
Add mushrooms.
Stir fry for another 5 minutes and add noodles.
The noodles will absorb a lot of the liquid. Keep stirring for another 3 to 5 minutes and add tofu again to heat it up to 1 minute.
Serve!
Caprese salad is a everyones favourite so what about a caprese tart?
Ingredients (4 to 6 portions)
1 1/2 cup plain flour (Around 230g)
150g butter, chilled, cut in small pieces
30ml cold water
200g ricotta cheese (Fresh ricotta is better)
1tbs balsamic vinegar
3 tomatos, thinly sliced, or you can use cherry tomatoes
2 boccocini or muzarella cheese, thinly sliced
fresh basil leaves
METHOD:

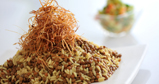
This dish or rice and lentils is a classic vegetarian meal. I made it the other day and its delicious.
The recipe came from my “Kosher cooking” book.
Ingredients: Serves 4 to 6
300g large brown or green lentils.
3 tbps olive oil
3 brown onions: 1 chopped, 2 thinly sliced
1 tsp ground cumin
1tsp ground cinamon.
3 cardamon pods
250g long grain rice, rinsed.
1 cup vegetable stock
salt and pepper to taste
Method.
1 Put the lentils in a large saucepan with enough water to cover generously. Its more water that you would put for rice for example. Bring it to boil, then simmer, for about 30 minutes or until tender. If you think its getting dry without the lentils being cooked, add bits of water. it shouldn’t get 100% dry because you haven’t cooked the rice yet.
Skim off any scum that forms on the top. when its almost ready go to step 2.
2 Heat half of the oil in a pan, add the chopped onion and fry for 5 minutes or until golden brown. Stir in half the cumin and half the cinnamon.
3 Add the fried onion to the pan of the lentils. Add the cardamom pods, rice and the stock. Mix well, then bring to boil again. Reduce the hear and cover to simmer until the rice is tender and (NOW YES) all the liquid has been absorbed. If the mixture appears a little too dry, add some extra water or stock. Season with salt and pepper to taste.
4 Meanwhile, heat the remaining oil in a pan, add the sliced onions and fry for about 10 minutes, until dark brown, caramelized and crisp. Sprinkle in the remaining cumin and cinnamon just before the end of cooking.
5 To serve, pile the rice and lentil mixture on to a serving dish, then top with the browned caramelized onions. Serve immediately.
I am not sure if this blog is updated anymore, but it is / was great
here is a repost from By the airport blog teaching how to transform Old license plates in desk organizers.
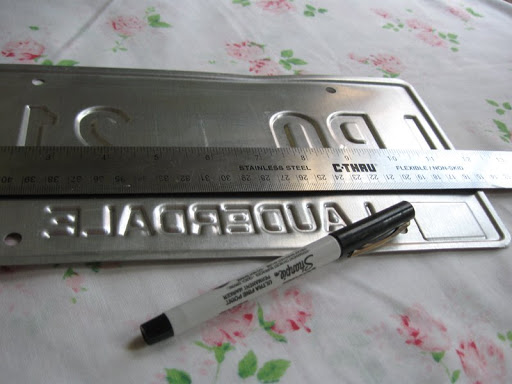
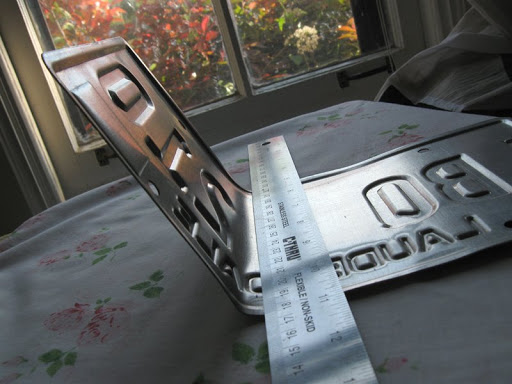
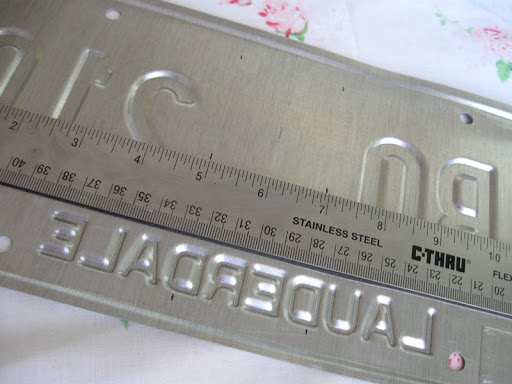 In general a license plate is about 30 Cm wide. Using your ruler, measure across the width of the license plate at 13cm and 18cm. This 5cm space will be the base of the file. I put small marks at the top, centre and bottom of the plate so that I get a nice straight edge.
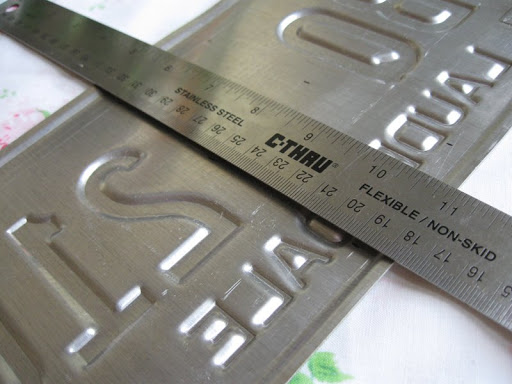 Place your ruler or other sturdy edge along the inside (what will be the base of the file) of one set of marks and make sure your ruler is lined up with the marks.
 A license plate is easily bended. Using your ruler as a guide, bend one side of the plate about 45 degrees. We’re only going to bend halfway so that there will be room to position your hand to bend the other side.
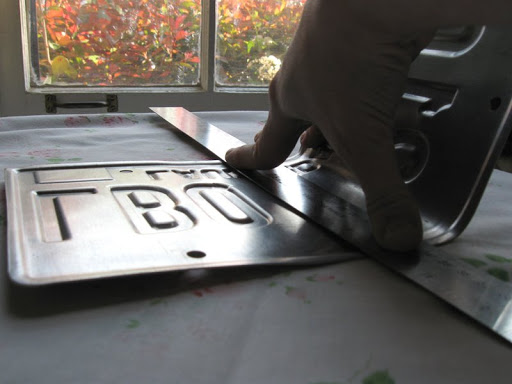 Next place your ruler along the inside of the second set of marks and use your fingers as shown above to hold the ruler and bend the other side about 45 degrees.
 Now you have a “U” shape. To finish the file work the sides to a vertical position so that you create a little file. The bottom corners will have a nice rounded shape.
To get the right shape just press down on the top of one side of the file against a hard surface and then rapidly bend the other side back and forth about 2cm in both directions. This helps to work the metal into the right shape. You could also use clamps to clamp the base of the file to a desk and then work the sides into the right form.
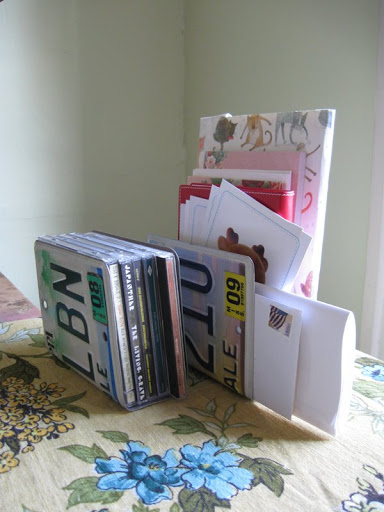 Ta da! This little file also works well to hold CDs.
(Alternately, you could bend the plates in half and use them as book ends.)

Another recipe for vegetarian quiche, this time more old school.
Adapted from Nestle Australia recipe.

Ingredients for 6:
| oil spray |
| 1 sheet frozen reduced fat puff pastry, thawed |
| 1 cup Carnation Light Evaporated Milk (Or another brand) |
| 3 eggs – I only use free range and advise everyone to do the same for several reasons. |
| 1/2 cup broccoli florets |
| 1/2 red capsicum, thinly sliced |
| 1 tomato, diced |
| 1 onion, diced |
| 4 button mushrooms, sliced 1 Zucchini thinly sliced |
| 1/4 cup grated low fat cheese |
METHOD:
Good Moooorning!
What is better than waking up for a healthy and delicious breakfast?
The other day, I explained here the difference between Muesli and Granola, and how easy it was to make it yourself.
So here it goes, an easy Bircher Muesli Recipe that is even better if made in advance (also because it takes a few hours to prepare it anyway)
Yesterday I posted about the cuttest measuring spoons and you can read all about it here!
But there is more. From the same Anthropologie store.
These ones cost AUD 19.60 (plus shipping) and are dishwasher safer.
In their words:
When your recipe calls for a dash of cheer and a tablespoon of charm, reach for these sweet spoons; each red-tipped handle features a floral motif and a little bird for good measure.

I just made it up this recipe and it is very nice
It is a Vegetable Pie / Quiche (I haven’t decided yet how to call it) maybe Bavarian Style?
anyway, here is the recipe:
you will need:
1/4 pumpkin
1 zucchini
2 carrots
1 sweet potato
1 brown onion
1 garlic clove
3 eggs
1 1/4 cups flour
extra flour to thicken the filling
3 tbsp butter / margarine (Cold / chopped)
250g Ricotta ( i used light)
2 tbsp sugar
1 tsp salt
plus salt (and pepper) to taste
Cinnamon
Nut meg
Oil Spray
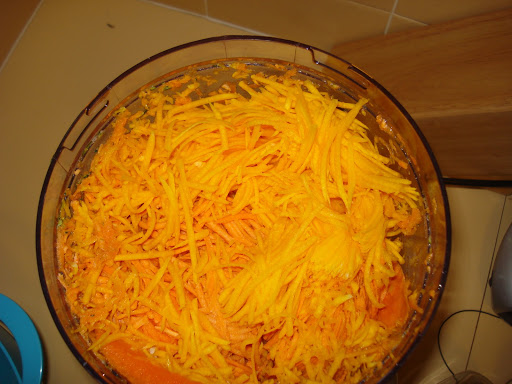
All the vegetables should be shredded. I used the food processor, because mine has a disc with this function, otherwise you can use the old and good metal one. The onion and garlic can be chopped.

But first, the dough
In a large bowl, put flour and salt and butter / margarine. Star mixing with your finger and it will become granular. add water, 1 spoon at time.
Make a ball, and wrap it with cling wrap paper and put it in the fridge to rest for 30 minutes.
It is a little bit messy, but it doesn’t matter because only goes on the bottom of your pie / quiche.
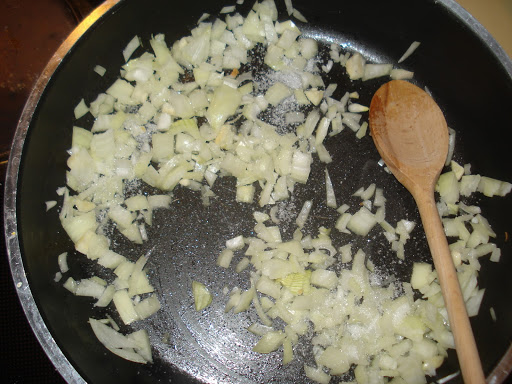
Heat up the oil in a large frypan, add onion and garlic and sugar.
Add some water so the sugar wont burn.
 |
| In this photo you can see is just enough sugar to “Cover” the onions. |
Add all the vegetables, and stir well. The vegetables will absorb the water.
Add some nutmeg and cinnamon and some flour (Very little), to thicken the mixure only a little bit and keep stirring for around 5 to 8 minutes in high heat.
Put it aside.
Preheat the oven to 180C.
in a separate bowl, beat up the eggs, and add half of the ricotta, salt and pepper to taste.
Open your dough between to pieces of baking paper, so you wont need to use extra flour.
Place the dough in the bottom and sides of a oven proof dish or baking tray.
Now this is how I made it (and dont ask me why)
First, a layer of the vegetables mixture.
Then, I poured a little bit of the egg mixture, that technically should penetrate in between the veggies.
Then, I put another layer of vegetables and egg.
Then Mix the rest of the ricotta with the rest of the vegetables and put it on the top.
I mixed everything a little bit but feel free to adapt and do it the “Right way”

I am showing this photo so you can see the inside.
It is delicious and healthy.
Yum Yum.

